JH7110 是 StarFive 出的 4 核 RISC-V 64 位 CPU,主频达 1.5GHz,具有丰富的外设。
StarFive 官方目前支持了 Linux 、Linux + RT-Thread 异构 AMP 架构双系统,可以在 https://github.com/starfive-tech/VisionFive2 下找到源码。
Linux + RT-Thread 异构 AMP 架构双系统中的 RT-Thread 运行在 M 态,不支持最新的 S 态下运行的 RT-Smart 。
在 S 态下运行 RT-Smart ,需要先实现将编译好的 RT-Smart 镜像 Image 通过 U-Boot 引导到 S 态下运行,然后逐步实现 RT-Smart 启动运行,4 核均运行RT-Smart 以及最终的 Linux + RT-Thread 混合运行形态。
通过此过程可以详细学习 RT-Thread SMP、SMART 模式以及混合部署等深度知识。
本文主要介绍如果将已经编译出来的 S 态下的 RT-Smart 镜像 Image 通过 U-Boot 下载到 S 态下运行,为后续移植做好准备。
Linux 下载流程介绍
在 U-Boot 下可以运行以下命令,通过网络下载启动Linux Image:
$ setenv ipaddr 192.168.xxx.xxx; setenv serverip 192.168.xxx.xxx;

$ tftpboot ${loadaddr} image.fit;

$ bootm start ${loadaddr};bootm loados ${loadaddr};run chipa_set_linux;run cpu_vol_set; booti ${kernel_addr_r} ${ramdisk_addr_r}:${filesize} ${fdt_addr_r};
进一步分析 U-Boot 的环境变量可以获知变量的值:
-
loadaddr=0x60000000
-
kernel_addr_r=0x40200000
-
ramdisk_addr_r=0x46100000
-
fdt_addr_r=0x46000000
可以看到内核的加载地址是 0x40200000
接下来我们通过层层分解介绍内核镜像文件生成过程。
image.fit
接下重点分析一下 image.fit 文件生成流程,通过分析 Makefile 文件,找到 image.fit 文件的生成流程。
在 Linux 编译完成后, image.fit 文件生成在 work/image.fit,该文件通过 work/u-boot/tools/mkimage -f conf/visionfive2-fit-image.its -A riscv -O linux -T flat_dt work/image.fit 命令生成。
FIT 镜像是一种灵活的镜像格式,可以包含:
-
内核镜像
-
设备树文件
-
根文件系统
-
其他启动所需的文件
mkimage 是 U-Boot 提供的镜像处理工具,其中:
-
-f参数指定 FIT 镜像的描述文件 -
.its文件是 FIT 镜像的配置文件,定义了镜像的结构和内容 -
-A参数指定目标架构为 RISC-V,告诉 mkimage 为 RISC-V 架构生成相应的镜像格式 -
-O参数指定操作系统类型为 Linux,决定了镜像的加载和启动方式 -
-T参数指定镜像类型为 flat_dt (Flattened Device Tree),表示这是一个包含设备树信息的镜像 -
image.fit输出的 FIT 镜像文件路径,.fit是 FIT 格式的标准扩展名
### visionfive2-fit-image.its
visionfive2-fit-image.its 文件是 FIT 镜像的配置文件,它定义了:
-
需要打包哪些文件(内核、设备树、根文件系统等)
-
这些文件的路径和属性
-
镜像的结构和配置
/dts-v1/;

/ {

description = “U-Boot FIT image for visionfive2”;

#address-cells = <2>;

images {

vmlinux {

description = “vmlinux”;

data = /incbin/(“../work/linux/arch/riscv/boot/Image.gz”);

type = “kernel”;

arch = “riscv”;

os = “linux”;

load = <0x0 0x40200000>;

entry = <0x0 0x40200000>;

compression = “gzip”;

};

ramdisk {

description = “buildroot initramfs”;

data = /incbin/(“../work/initramfs.cpio.gz”);

type = “ramdisk”;

arch = “riscv”;

os = “linux”;

load = <0x0 0x46100000>;

compression = “none”;

};

fdt {

data = /incbin/(“../work/linux/arch/riscv/boot/dts/starfive/jh7110-starfive-visionfive-2-v1.3b.dtb”);

type = “flat_dt”;

arch = “riscv”;

load = <0x0 0x46000000>;

compression = “none”;

hash-1 {

algo = “sha256”;

};

};

};

configurations {

default = “config-1”;

config-1 {

description = “visionfive2 with opensbi”;

kernel = “vmlinux”;

fdt = “fdt”;

loadables = “ramdisk”;

};

};

};
从 visionfive2-fit-image.its 文件中我们可以看到内核镜像采用 gzip 压缩,最终位于 work/linux/arch/riscv/boot/Image.gz。
### 内核镜像
Makefile 中调用 gzip -n -f -9 Image > Image.gz 命令压缩内核镜像为 Image.gz。
以上梳理完成了从内核镜像压缩、打包的全过程。
## RT-Smart 打包与下载
RT-Smart 是基于 RT-Thread 操作系统衍生,面向带 MMU(Memory Management Unit),中高端应用的芯片,例如 ARM Cortex-A,MIPS,带 MMU 的 RISC-V 芯片等。RT-Smart 在 RT-Thread 操作系统的基础上启用独立、完整的进程方式,同时以混合微内核模式执行。
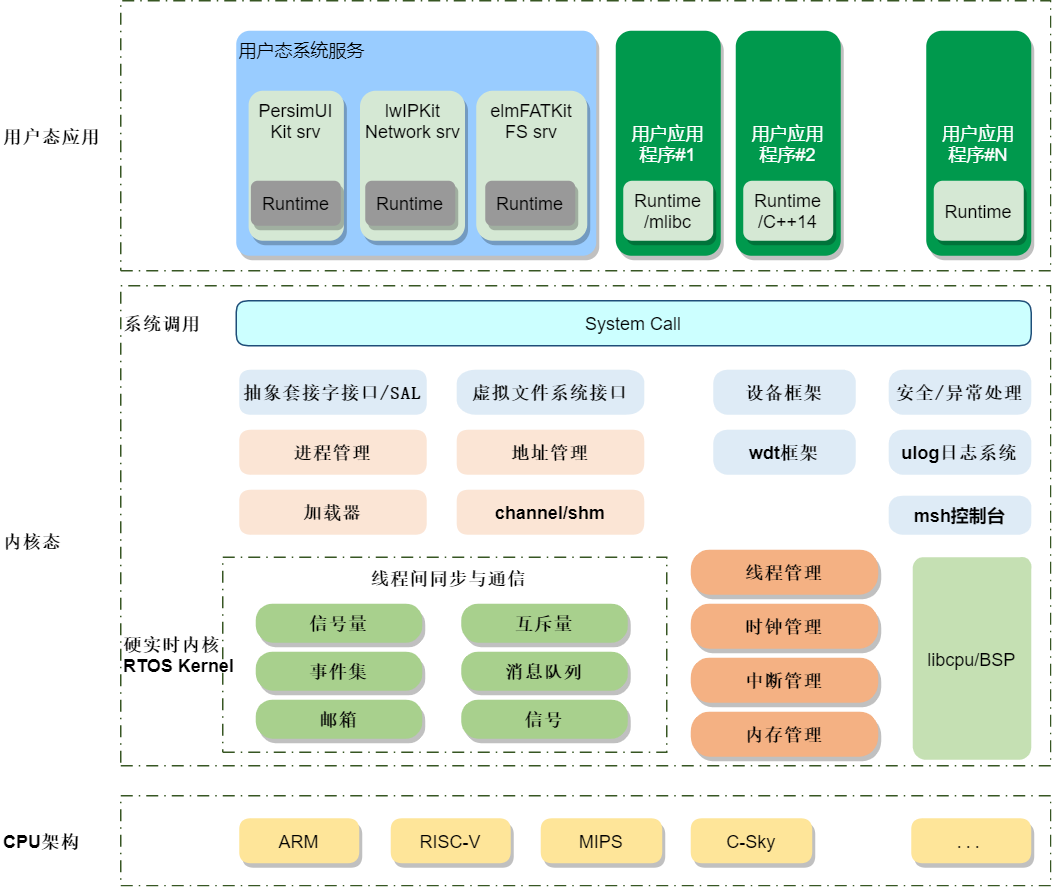
RT-Smart 工作在 S 态,需要 MMU 支持,和工作在 M 态的 RT-Thread 标准版有较多不同。关于 RT-Smart 适配相关的内容涉及的面很多,这里不展开,后续再详细介绍。
因为 RT-Smart 和 Linux 一样都是运行在 RISC-V 的 S 态,所以我们就可以依照 RT-Smart 编译后的内核文件,可以依照上面介绍的流程完成 gzip 镜像压缩、Image.fit 文件生成。
### 下载
打包完成后,在 U-Boot 下通过网络,使用 tftp 下载下载至内存即可:
$ setenv ipaddr 192.168.xxx.xxx; setenv serverip 192.168.xxx.xxx;

$ tftpboot ${loadaddr} image.fit;
### 加载
要重点讲一下 RT-Smart 镜像加载,如直接使用与 Linux 一样的加载命令 bootm start ${loadaddr};bootm loados ${loadaddr};run chipa_set_linux;run cpu_vol_set; booti ${kernel_addr_r} ${ramdisk_addr_r}:${filesize} ${fdt_addr_r};,就会记载失败,提示:
\## Loading kernel from FIT Image at 60000000 …

Using ‘config-1’ configuration

Trying ‘vmlinux’ kernel subimage

Description:  vmlinux

Type:         Kernel Image

Compression:  gzip compressed

Data Start:   0x600000c8

Data Size:    150280 Bytes = 146.8 KiB

Architecture: RISC-V

OS:           Linux

Load Address: 0x40200000

Entry Point:  0x40200000

Verifying Hash Integrity … OK

\## Loading fdt from FIT Image at 60000000 …

Using ‘config-1’ configuration

Trying ‘fdt’ fdt subimage

Description:  unavailable

Type:         Flat Device Tree

Compression:  uncompressed

Data Start:   0x60443094

Data Size:    52430 Bytes = 51.2 KiB

Architecture: RISC-V

Load Address: 0x46000000

Hash algo:    sha256

Hash value:   10316006cf096dc6675a571d94c9223c4a433def973b9623ea306e8d57637869

Verifying Hash Integrity … sha256+ OK

Loading fdt from 0x60443094 to 0x46000000

Booting using the fdt blob at 0x46000000

\## Loading loadables from FIT Image at 60000000 …

Trying ‘ramdisk’ loadables subimage

Description:  buildroot initramfs

Type:         RAMDisk Image

Compression:  uncompressed

Data Start:   0x60024c84

Data Size:    4318097 Bytes = 4.1 MiB

Architecture: RISC-V

OS:           Linux

Load Address: 0x46100000

Entry Point:  unavailable

Verifying Hash Integrity … OK

Loading loadables from 0x60024c84 to 0x46100000

Uncompressing Kernel Image

Bad Linux RISCV Image magic!

StarFive #
运行 RT-Smart 的镜像文件报错 Bad Linux RISCV Image magic! ,而 Linux 镜像就不会。
经过分析后发现是在 U-Boot 中使用了 booti 命令启动镜像。
### booti 命令
booti 命令是 U-Boot 中专门用于启动 Linux 内核的命令,特别针对 ARM64 和 RISC-V 架构设计。
- 命令语法
$ booti \[addr \[initrd\[:size\]\] \[fdt\]\]
参数说明:
-
addr: 内核镜像的内存地址
-
initrd[:size]: initrd/ramdisk的地址和可选大小
-
fdt: 设备树(Device Tree)的地址
- 命令功能
主要作用:
-
验证内核镜像格式:检查 Linux 内核头部的魔数和结构
-
解析内核头部信息:获取加载地址、入口点、镜像大小等
-
设置启动参数:配置内核启动所需的环境
-
跳转到内核:将控制权移交给Linux内核
- 支持的镜像格式:
-
Image:未压缩的内核镜像
-
Image.gz:gzip压缩的内核镜像
-
zImage:自解压的内核镜像
- 内核头部验证
booti命令会验证Linux内核的64字节头部结构:
struct linux_image_header {

uint32_t code0;        /\* 可执行代码 \*/

uint32_t code1;        /\* 可执行代码 \*/

uint64_t text_offset;  /\* 镜像加载偏移 \*/

uint64_t image_size;   /\* 有效镜像大小 \*/

uint64_t flags;        /\* 内核标志 \*/

uint32_t version;      /\* 头部版本 \*/

uint32_t res1;         /\* 保留 \*/

uint64_t res2;         /\* 保留 \*/

uint64_t res3;         /\* 保留 \*/

uint32_t magic;        /\* 魔数1: “RISCV” \*/

uint32_t magic2;       /\* 魔数2: “RSC\\x05” (0x05435352) \*/

};
- 使用示例
基本用法:
\# 指定内核地址

$ booti 0x40200000
- 与其他启动命令的区别
| 命令 | 适用架构 | 镜像格式 | 验证机制 |
| -------- | ---------- | ---------- | ---------- |
| booti | ARM64/RISC-V | Image/Image.gz | 严格头部验证 |
| bootz | ARM32 | zImage | 简单验证 |
| bootm | 通用 | uImage/FIT | U-Boot头部验证 |
| go | 通用 | 任意 | 任意 | 无验证 |
- 常见错误信息:
\# 魔数错误

“Bad Linux RISCV Image magic!”

\# 镜像大小错误

“RISCV Image size exceeded”

\# 加载地址错误

“RISCV Image load address out of range”
- 在U-Boot配置中:
CONFIG_CMD_BOOTI=y      # 启用booti命令

CONFIG_RISCV=y          # RISC-V架构支持

CONFIG_OF_LIBFDT=y      # 设备树支持
- 内核镜像转换
转换为二进制格式

objcopy -O binary -R .note -R .note.gnu.build-id -R .comment -S vmlinux Image
经过以上分析,我们可以理解到,在使用 booti 命令加载 RT-Smart 镜像时因为没有匹配到魔数,所以启动失败了,需要更换为 go 启动。
### 启动 RT-Smart 镜像
更换启动命令后,使用 go 命令加载 image.fit 文件后即可启动 RT-Smart。
$ bootm start ${loadaddr};bootm loados ${loadaddr};run chipa_set_linux;run cpu_vol_set; go ${kernel_addr_r} ${fdt_addr_r};

\## Loading kernel from FIT Image at 60000000 …

Using ‘config-1’ configuration

Trying ‘vmlinux’ kernel subimage

Description:  vmlinux

Type:         Kernel Image

Compression:  gzip compressed

Data Start:   0x600000c8

Data Size:    150280 Bytes = 146.8 KiB

Architecture: RISC-V

OS:           Linux

Load Address: 0x40200000

Entry Point:  0x40200000

Verifying Hash Integrity … OK

\## Loading fdt from FIT Image at 60000000 …

Using ‘config-1’ configuration

Trying ‘fdt’ fdt subimage

Description:  unavailable

Type:         Flat Device Tree

Compression:  uncompressed

Data Start:   0x60443094

Data Size:    52430 Bytes = 51.2 KiB

Architecture: RISC-V

Load Address: 0x46000000

Hash algo:    sha256

Hash value:   10316006cf096dc6675a571d94c9223c4a433def973b9623ea306e8d57637869

Verifying Hash Integrity … sha256+ OK

Loading fdt from 0x60443094 to 0x46000000

Booting using the fdt blob at 0x46000000

\## Loading loadables from FIT Image at 60000000 …

Trying ‘ramdisk’ loadables subimage

Description:  buildroot initramfs

Type:         RAMDisk Image

Compression:  uncompressed

Data Start:   0x60024c84

Data Size:    4318097 Bytes = 4.1 MiB

Architecture: RISC-V

OS:           Linux

Load Address: 0x46100000

Entry Point:  unavailable

Verifying Hash Integrity … OK

Loading loadables from 0x60024c84 to 0x46100000

Uncompressing Kernel Image

\## Starting application at 0x40200000 …

heap: \[0x0x000000008028a8f0 - 0x0x0000000080a8a8f0\]

\\ | /

- RT -     Thread Operating System

/ | \\     5.2.1 build Jul 27 2025 23:12:45

2006 - 2024 Copyright by RT-Thread team

msh />
由于目前 RT-Smart 未使用设备树,也可以使用 bootm start ${loadaddr};bootm loados ${loadaddr};run chipa_set_linux;run cpu_vol_set; go ${kernel_addr_r}; 启动。
完成镜像下载及启动后,就可以开始下一步的适配工作了。